1. Additional documentation
- Safety Information
- Datasheet
- Quickstart guide
2. Unboxing and mounting options
- 2.1 Mounting the antenna
- 2.2 Wall mounting
- 2.3 Screen Mounting
3. Getting your setup ready
- 3.1 Single display setups
- 3.1.1 Setup A - Single display for local use with a All-in-one video bar
- 3.1.2 Setup B – Single display setup with ability to share screen in meetings
- 3.1.3 Setup C – Single display with Microsoft Teams Room PC and share function
- 3.1.4 Setup D – Setup C with detailed cable drawings
- 3.1.5 Setup F – Wired BYOM setup with docking station
- 3.2 Companion Setups
- 3.2.1 Setup A - Companion display as collaboration hub in a meeting room
- 3.2.2 Setup B - Companion display in a meeting room with share function
- 3.2.2 Setup C - Companion display in a meeting room with share function
- 3.2.3 Setup D - Dual display Windows MTR setup with share function
- 3.2.4 Setup E - Dual Display Microsoft Teams/Zoom Room setup with companion display for collaboration
- 3.3 Usage of the USB-HDMI adapter to Share in Meeting
- 3.3.1 Flatfrog recommended USB-HDMI adapter
- 3.3.2 Configure Microsoft Teams Room on Android
4. Powering up for the first time
- 4.1 The Start Screen
- 4.2 Video Meetings
- 4.2.1 Sleep mode - Tap to wake
- 4.3 Whiteboarding
- 4.4 Wireless Presentations
5. Combining video meetings, screen sharing and whiteboarding
- 5.1 Interacting with content
- 5.2 Share in meeting
6. In-app options
-6.1 Compatibility mode
-6.2 Sound
7. Updating TeamTablet Flex
8. Local device management
- 8.1 Custom wallpaper/background
9. Customer support and feedback
1. Additional documentation
TeamTablet Flex Adoption Toolkit (ENG)
TeamTablet Flex Einführung Toolkit (DE)
2. Unboxing and mounting options
The following items are included in the TeamTablet Flex box

Included is a mounting bracket that can be used for both wall and screen mounting.
2.1 Mounting the antenna

2.2 Wall mounting
For wall mounting use the included wall screws (and wall plugs when applicable) to securely fasten the wall mount to the wall.
Attach the TeamTablet Flex to the mounting bracket by aligning the plugs on the bottom of the device with the holes on the mount and sliding it to lock in place.

Please make sure that the mounting bracket is oriented correctly, with the arrow pointing up!
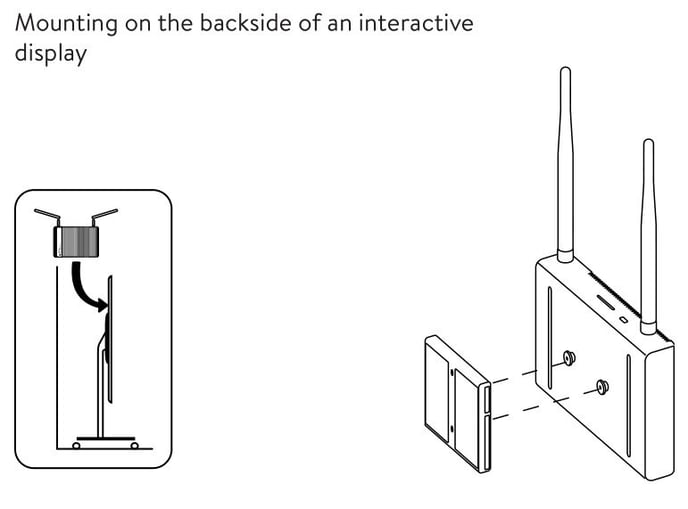
2.3 Screen Mounting
For screen mounting use the included double-sided tape on the mounting bracket to attach it to the back of the display. Ensure there is good contact across the entire tape surface.
Attach the TeamTablet Flex to the mounting bracket by aligning the plugs on the bottom of the device with the holes on the mount and sliding it to lock in place.
3. Getting your setup ready
To be able to use and setup your device, the minimum amount of cables needed are:
Power to the Flex
HDMI from the Flex to your Interactive display
USB touch out from your Interactive display into the Flex

USB3.0 port is used for the USB-HDMI adapter explained in 3.3
The Flex can be configured to work with multiple existing setups. They have been categorized into two categories, the Single Display setup and the Companion Display setup.
The Single Setup is recommended if the large interactive display is the only screen in the meeting room. The Companion Setup is recommended if you will use a separate display for video meetings
Depending on your needs, please find the appropriate setup for your space and follow the connection instructions.
Note: In most setups, a third-party USB-HDMI adapter is used to project the contents of the TeamTablet Flex in to your choice of meeting solution. This is intended to be used to show what's happening on the TeamTablet Flex to remote participants (eg. local wireless screen sharing or whiteboarding). See a more detailed view of USB-HDMI usage in section 3.3.
3.1 Single display setups
3.1.1 Setup A - Single display for local use with a All-in-one video bar
✳️ TeamTablet Flex
✳️ Interactive Display
✳️ All-in-one video bar
This option do not allow to share the full screen content in the video meeting. You are still able to share the whiteboard for collaboration with remote users with flatfrogboard.com
3.1.2 Setup B - Single display setup with ability to share screen in meetings
✳️ TeamTablet Flex
✳️ Interactive Display
✳️ All-in-one video bar
✳️ Content sharing through USB-HDMI adapter
USB-HDMI Splitter and additional HDMI cables are not included in the TeamTablet Flex box by default.
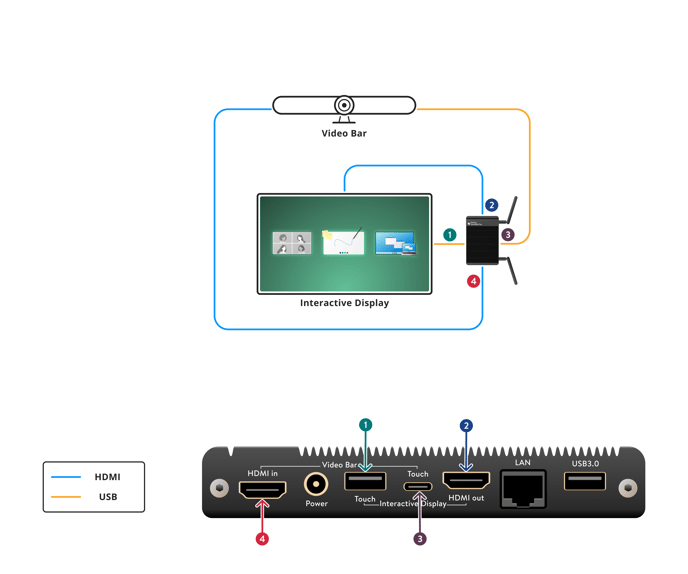
3.1.3 Setup C - Single display with Microsoft Teams Room PC and share function
✳️ TeamTablet Flex
✳️ Interactive Display
✳️ Windows MTR/Zoom Room

3.1.4 Setup D - Same as Setup C but with detailed cable drawings for all components
✳️ TeamTablet Flex
✳️ Interactive Display
✳️ Windows MTR/Zoom Room (With Meeting Touch Panel)
✳️ Content sharing through USB-HDMI adapter

The wiring above includes all cables used with a Windows MTR system and in the image a Logitech Cat5e kit is used.
3.1.5 Setup E - Wired BYOM setup with separate docking station
✳️ TeamTablet Flex
✳️ Interactive Display
✳️ Additional display for video meetings
✳️ USB Video bar
✳️ Docking station
.png?width=688&height=434&name=Frame%2037306%20(1).png)
3.2 Companion Setups
💡For all Companion setups it is recommended to turn of the left window since this is not used when having a companion. See below.
In settings go to Start Screen and then deselect the "Show HDMI widget"
The start screen would then look like this.

3.2.1 Setup A - Companion display as collaboration hub in a meeting room
✳️ TeamTablet Flex
✳️ Interactive Display
✳️ Additional display for video meetings

This option do not allow to share the full screen content in the video meeting. You are still able to share the whiteboard for collaboration with remote users with flatfrogboard.com
3.2.2 Setup B - Companion display in a meeting room with share function
✳️ TeamTablet Flex
✳️ Interactive Display
✳️ Additional display for video meetings
✳️ Meeting Touch Panel
✳️ Content sharing through USB-HDMI adapter

Depending on the hardware used the USB-HDMI cable for HDMI-ingest could also be connected to the Meeting Touch Panel. Above example shows when HDMI-ingest is used in the All-in-one video bar. See below setup for a solution with a Meeting Touch panel.
USB-HDMI adapater and additional HDMI cables are not included in the TeamTablet Flex box by default.
3.2.2 Setup C - Companion display in a meeting room with share function
✳️ TeamTablet Flex
✳️ Interactive Display
✳️ Additional display for video meetings
✳️ Meeting Touch Panel
✳️ Content sharing through USB-HDMI adapter

3.2.3 Setup D - Dual display Windows MTR setup with share function
✳️ TeamTablet Flex
✳️ Interactive Display
✳️ Additional display for video meetings
✳️ All-in-one video bar
✳️ Content sharing through HDMI Splitter

Above illustration show only the integration of the TeamTablet Flex in a Dual display Windows MTR/Zoom setup. The video bar and the left display is configured traditionally with the PC.
USB-HDMI Splitter and additional HDMI cables are not included in the TeamTablet Flex box by default.
3.2.6 Setup E - Dual Display Microsoft Teams/Zoom Room setup with companion display for collaboration
✳️ TeamTablet Flex
✳️ USB-HDMI adapter
✳️ Interactive Display
✳️ Two display configuration in front of room
✳️ Video bar
✳️ Meeting room touch panel with HDMI-ingest
✳️ Windows MTR/Zoom Room

3.3 Usage of the USB-HDMI adapter to Share in Meeting
The intended use for the USB-HDMI adapter is to project a duplicated image to your meeting software so that the remote participants can also se locally shared content. For example, if someone in the physical meeting room is sharing through Miracast, you will be able to share this with your remote meeting participants.
With the USB-HDMI adapter connected you get a extra icon in the user interface "Share in meeting". If you configure the
For Microsoft Teams Rooms, press the Share button and select Connected device.
See video of share in meeting feature below.
Single display with Windows MTR (with Android MTR you can start the meeting directly on the display)
Companion display with Windows MTR (Same behavior with Android MTR)
3.3.1 Flatfrog recommended USB-HDMI adapter

WavLink WL-7601HC
The USB-A connector on the USB-HDMI adapter connects to the USB3.0 port on the TeamTablet Flex.
Then you connect a HDMI cable from the HDMI-out (output is 1080P always) to HDMI-ingest on your video bar (Rally bar, Poly X Studio or Jabra Panacast) or to the meeting room touch controller (Logitech Tap).
3.3.2 How to configure Microsoft Teams Room on Android to enable sharing of TeamTablet Flex
Microsoft Teams Room on Android (MTRa) allows you to turn on and off HDMI-sharing and to enable automatic sharing when a HDMI-signal is detected.
For TeamTablet Flex follow these step for a Android all-in-one video bar.
Click Meetings in advanced setup after login into Teams settings on the Android video system.

Under Content sharing – make sure Enable HDMI content sharing is on and turn on “Automatically share to the room display” as below.
Exit to MTR start screen and you are done. Make sure to connect USB-HDMI-adapter as described in 3.3.
In Windows MTR login with your admin credentials and activate Automatic Screen Sharing.
4. Powering up for the first time
When powering up your Flex for the first time you'll need to register your device.
With TeamTablet Flex you get 3 yr cloud whiteboarding.
You go to https://flatfrogboard.com/link or scan the QR-code with your phone.
It is preferred that one person administrates all rooms.
You will need to sign up to an account.
After regestring your e-mail you enter the code you see on the display.
Followed by the name you want for the unit.

When the room is registered you will see it under your Profile at flatfrogboard.com
Here you also see how long the license last and as an IT-admin you can see if the system is up with a green dot or offline by a red dot.
![]()
You can manage the Room by clicking the three dots to the right.
If you skip the registration flow at startup you will go to Offline-whiteboard.
You will then not be able to collaborate with external parties - only work locally without any saving options.
If you skip the registration flow at startup you will go to Offline-whiteboard.
You will then not be able to collaborate with external parties - only work locally without any saving options.
If you prefer to activate the cloud whiteboard and register TeamTablet Flex at a later time by going to the Settings =>> Whiteboard and turn on Cloud Saving and Collaboration.
Note: If you have not connected to the internet through the Ethernet port, you will be greeted by a Wi-Fi network selection view.
4.1 The Start Screen

From the Start Screen you have access to all your content.
Video Meeting Whiteboard Wireless Screen share
4.2 Video Meetings
Interacting with the video meeting content panel (left) will bring it up in full screen with touch back. From here you can interact with the meeting content on screen. To go back, there is a minimize icon top right.
Using the full screen view of the video meeting is just like having the All-in-one video bar directly connected to the Interactive display.
🌟 Your video meeting is always available, even when you're whiteboarding!
4.2.1 Sleep mode - Tap to wake

If you see this symbol when having a connected HDMI-cable then your connected device is not sending HDMI-signal to the HDMI-in on TeamTablet Flex. This could be the case if your video bar has entered sleep mode. If you have the touch back cable connected from TeamTablet Flex ( USB-C on TeamTablet Flex to USB-A ) to the video bar or meeting room PC then you should be able to wake it up by clicking the window.
🌟 TeamTablet Flex do not go into sleep mode.
4.3 Whiteboarding
To start whiteboarding, interact with the whiteboarding panel. Here you can access both content panels in picture in picture mode. These panels can be resized, moved and snapped to corners.
Board layout
- Add sticky notes
- Add stickers
- Change ink width
- Change ink color
- Undo / Redo
- Paste (after copying an object)
- Hamburger menu - Board name
- View all pages and sort pages, < Change page > / + Add page/Add template
- User name
- Current Board code (click to view collaboration info below)

Learn more about the whiteboard on the FlatFrog Board for Rooms learning pages.
4.4 Wireless Presentations
To start sharing wirelessly, interact with the presentation panel (right) for instructions. Once connected, you can bring it up in the same way as the video meeting content panel in fullscreen with touch back.
Pressing on the presentation panel will bring up instructions for different operating systems.

✅ Windows
Screen share your laptop by pressing Windows + K and select TeamTablet Flex.
Make sure to activate ☑️ "Allow mouse, keyboard, touch, and pen input"
Control your laptop from the display. See details below.

✅ macOS

Note: For macOS sharing, both the TeamTablet Flex and the MacBook must be on the same network.
Once connected, you can always disconnect from your device, the Start Screen or through the icon in the top right in full screen mode.


4.5 Wireless Presentations - security
Through the Local Device Management portal (see section 8. Local Device Management), there is options to turn on the security (PIN) feature for both Miracast and AirPlay.
To do this, let your local administrator enter the Local Device Management, then under the General tab and the Screensharing Security section, you will find the setting to configure this.

There are three options
- None - No PIN code will be shown. All clients connected will automatically be accepted
- Pin (Static) - Choose your own static PIN code
- Pin (Random) - Randomize a 4-digit PIN for each connection attempt [RECOMMENDED]
For Windows computers that have previously connected to a TeamTablet Flex with the None option, there will be some time where the connection might fail or take a bit longer the first time you connect with PIN code enabled. This is due to the internal Windows cache still thinking that the device does not require any authentication. This should clear up after one connection attempt.
5. Combining video meetings, screen sharing and whiteboarding
When in whiteboarding, you will have access to your content at all times.
The "picture-in-picture" windows can be moved, resized, maximized and minimized
5.1 Interacting with content
There are buttons on the side of the picture in picture windows that control certain features or behavior.
Minimize, Full screen, Screenshot and Touchback
Note: Touchback functionality only works with Windows and must be enabled on the presenting computer.

Minimize picture in picture window
Maximize picture in picture window
Take snapshot of window content to whiteboard

When interacting with the Video meeting/HDMI In window or the Miracast window inside the whiteboard you have also the option to move the window and resize with pinch or to interact with the content in the window by pressing Interact.
5.2 Share in meeting
When running a video meeting you can easily share everything that happens on TeamTablet Flex in the meeting
If you have configured your setup as described in 3.3 you get a extra icon on your layout.
This button enables you to share everything that happens on the display to remote participants.
Click Share in Meeting to start sharing.
6. In-app options

From the in-app options, you can configure your device to your desired setup. There's also information of the app version, application updates and network options.
The Start Screen options allow you to customize certain UI elements to your liking. From here you can also change your time zone. Choose the continent and closest city to your location to set your persistent time zone (see option below).
Change Room Name
The Room Name can be modified using the on-screen keyboard. This name will be shown on the display and will serve as the identifier when you connect for screen sharing.
Note! This is done on flatfrogboard.com after you register the device - then you can not change the name on the display.

For more settings use the Local Device Management feature.
Note: Future software updates will allow you to change settings through a centralized system.
6.1 Compatibility mode
On some displays, touch reporting is not fully compatible. This might be affecting fingers or pens.
For these systems, there is a compatibility mode that can be turned on both through on-device settings and on the local device management.
For screens that have touch working in some form:
- Go to Settings -> Whiteboard
- Set Interaction Mode to Draw/move/erase with fingers and pens

For screens that don't have touch working
- We need to access the local device settings from a browser.
- If you know what IP address the Flex has, go to http://ipaddress:8080
- If not, please see below:
- First, connect to the device through Miracast with Win + K and then choose the Room name (we do this so that we can set up a network to the device).
- Then access the local device settings at http://192.168.16.1:8080
- Log in with admin credentials (default should be: Username: admin, Password: flatfrog)
- In the tabs above, go to Whiteboard.
- Then set Interaction mode to "Finger only"
- Apply settings and then refresh.

6.2 Sound
In the application settings, you can find the Sound settings on the tabs on the left.
Here you can control:
- System sounds: Adjust click sounds for interacting with menus and HDMI in
- Miracast/Airplay: Adjust Incoming sound from screensharing
- Master volume: The final mixed sound that will be outputted on HDMI out (System sounds, HDMI in and screenshare audio combined)
All of these controls have a toggle button for instant mute.
7. Updating TeamTablet Flex
When a new software release is out this will show on the lower right at the start screen.
Just click Update and Restart and updates will be executed, depending on the update this can be required to be done once or twice since downloads are done in the backend. 

8. Local device management
With TeamTablet Flex device management you are able to connect to the device through a web browser.
You need to be on the same network as TeamTablet Flex and you connect directly to the IP-address that can be found under General tab after entering settings on the display.
Connect to the IP adress and add port :8080 - example 192.168.10.123:8080
Default user name is: admin and password: flatfrog
From here you can upload background image to display, set time zone etc.
💡If you Miracast to the unit you can from that PC enter the web interface directly by going to the fixed local IP address 192.168.16.1:8080

8.1 Custom wallpaper/background
You have the option to customize your background image thru the device management by providing a .jpeg or .png file, ensuring that the file size is under 10 MB. For optimal visual quality, we recommend using an image with a resolution of 3840 x 2160 pixels (4K). Be mindful to choose an image that complements the TeamTablet Flex layout without causing distractions. Once you input the link, the image will be uploaded to the TeamTablet Flex. You can toggle it on or off using the designated button.
9. Customer support and feedback
If you encounter any issues or have any questions, please create a support ticket here: